Parent App
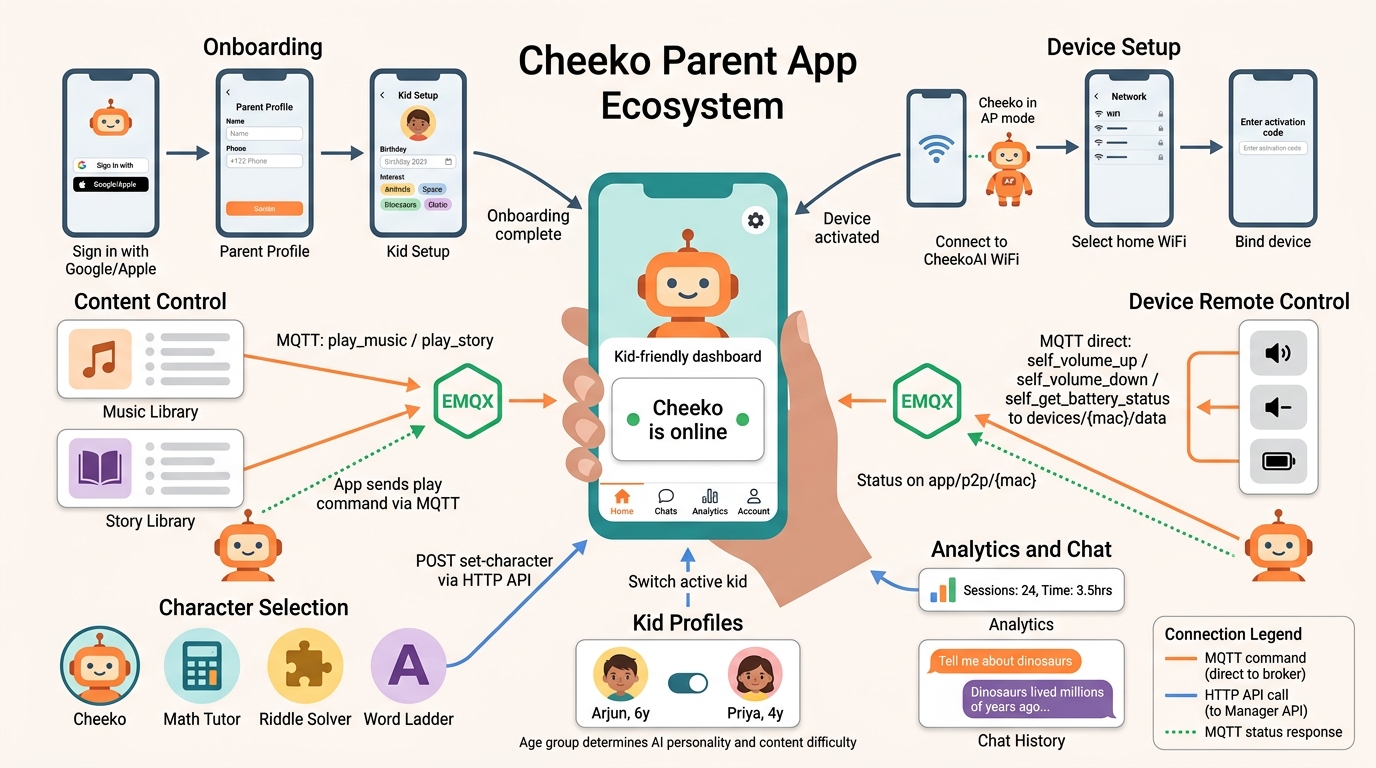
Flutter app for parents to set up and manage Cheeko devices, create child profiles, browse content, and monitor usage. It is the primary control surface for the Cheeko ecosystem — every device must be provisioned and bound to a kid profile through this app before it can be used.
Tech Stack
| Item | Value |
|---|---|
| Flutter SDK | ^3.7.2 |
| App version | 3.8.5+3 |
| State management | Provider (provider ^6.1.5+1) |
| Authentication | Firebase Auth ^5.4.0 — Google Sign-In (Android) and Apple Sign-In (iOS/macOS) |
| HTTP client | http ^1.5.0 |
| Device command channel | mqtt_client ^10.4.0 via EMQX broker |
| WiFi provisioning | wifi_iot ^0.3.19+1 + wifi_scan ^0.4.1+2 (Android); NEHotspotConfiguration native channel (iOS) |
| Secure storage | flutter_secure_storage ^10.0.0 |
| In-app updates | upgrader ^12.3.0 + Shorebird OTA (shorebird.yaml) |
| Environment config | flutter_dotenv ^6.0.0 |
| Notifications | flutter_local_notifications ^19.4.2 |
App Navigation
The app uses a floating bottom navigation bar (MainNavigationScreen) with four tabs backed by a PageView. Navigation between screens is handled by named routes via AppRoutes.onGenerateRoute in lib/routes/routes.dart.
Bottom navigation tabs
| Tab index | Label | Screen |
|---|---|---|
| 0 | Home | HomeScreen — activity dashboard with content entry points |
| 1 | Chats | ChatHistoryScreen — conversation transcripts |
| 2 | Analytics | AnalyticsScreen — usage statistics per device |
| 3 | Account | ParentProfileScreen — profile, characters, settings |
The floating navbar is only visible inside the main app. All onboarding screens hide it via AssistiveButtonProvider.
Full route table
| Route constant | Path | Screen file |
|---|---|---|
splash | / | onboarding/splash_screen.dart |
walkthrough | /walkthrough | onboarding/walkthrough_screen.dart |
parentProfileSetup | /parent-profile-setup | onboarding/parent_profile_setup_screen.dart |
kidsDetails | /kids-details | onboarding/interactive_kids_onboarding_screen.dart |
mainNavigation | /main_navigation | main_navigation_screen.dart |
toyActivation | /toy-activation | home/toy_activation_screen.dart |
chitChat | /chit_chat | home/chit_chat_screen.dart |
musicLibrary | /music_library | content/music_library_screen.dart |
storyLibrary | /story_library | content/story_library_screen.dart |
chatHistory | /chat_history | chat/chat_history_screen.dart |
analytics | /analytics | analytics/analytics_screen.dart |
characterManagement | /character_management | profile/character_management_screen.dart |
agentDetails | /agent_details | agent/agent_details_screen.dart |
parentProfile | /parent_profile | profile/parent_profile.dart |
editProfile | /edit_profile | profile/edit_profile.dart |
developerOptions | /developer_options | developer/developer_options_screen.dart |
Features and Screens
Onboarding
Splash Screen (splash_screen.dart)
Entry point for every app launch. Displays the Cheeko logo for 3 seconds, then checks auth and onboarding state to decide where to send the user.
Navigation logic:
- No active Firebase session →
WalkthroughScreen - Session exists, onboarding previously completed locally →
MainNavigationScreen - Session exists, backend
UserStateService.getUserStatereturns null → new user, create user state →ParentProfileSetupScreen - Backend state shows onboarding incomplete, no parent profile →
ParentProfileSetupScreen - Backend state shows onboarding incomplete, parent profile exists →
InteractiveKidsOnboardingScreen - Backend state shows onboarding complete but all kids deleted →
InteractiveKidsOnboardingScreen - Backend state shows onboarding complete with kids →
MainNavigationScreen - Network timeout (5 s) → falls back to locally cached onboarding flag
Walkthrough Screen (walkthrough_screen.dart)
Sign-in screen shown to unauthenticated users. Displays a hero image with gradient overlay and platform-specific sign-in buttons.
Key user actions:
- Android: "Sign in with Google" button
- iOS/macOS: "Continue with Apple" button
- Links to Terms of Service and Privacy Policy (opens external browser)
Sign-in result routing:
- New Google user →
ParentProfileSetupScreen - New Apple user with name available → profile auto-created, routed directly to
InteractiveKidsOnboardingScreen(skips profile setup step per Apple Review Guideline 4) - New Apple user without name →
ParentProfileSetupScreen - Returning user →
MainNavigationScreen
Service: auth_service.dart
Parent Profile Setup Screen (parent_profile_setup_screen.dart)
Collects parent name and phone number. Pre-fills name from FirebaseAuth.currentUser.displayName when available (e.g. after Google or Apple sign-in).
Key user actions:
- Enter full name (2–50 characters, letters only)
- Select country code with a flag picker (
fl_country_code_picker) - Enter phone number (7–15 digits)
- Tap "Continue" to submit
API call: POST /toy/api/mobile/profile via ProfileApiService.createParentProfile
On success, navigates to InteractiveKidsOnboardingScreen.
Kid Profile Onboarding Screen (interactive_kids_onboarding_screen.dart)
Multi-step animated wizard (smooth page indicator) for creating the first child profile. Collects all required kid data across several pages.
Steps collected:
- Kid's name
- Date of birth (calendar picker via
syncfusion_flutter_datepicker) - Gender selection
- Interest selection from preset list (Animals, Space, Dinosaurs, Fairy Tales, Superheroes, Music, Science, Art, Sports, Nature, Vehicles, Cooking) plus custom interests
- Primary language (English, Hindi, Kannada, Malayalam)
- Additional notes (optional)
- Completion with confetti animation
On completion:
- Creates kid profile via
JavaKidProfileService - Marks onboarding as complete in
UserStateService - Saves
onboardingCompleted = truetoSharedPreferences - Routes to
MainNavigationScreen
API calls:
POST /toy/api/mobile/kids— create kid profilePUT /toy/api/mobile/user-state— mark onboarding complete
Device Setup and Activation
Entry point is ToyActivationScreen (home/toy_activation_screen.dart), which uses a PageView with three step widgets and a ToyActivationController.
Steps:
- Welcome step — explains the process, offers "Skip" to go directly to activation code entry
- WiFi configuration step — connects phone to Cheeko AP, selects home network, sends credentials
- Activation code step — binds the device to the user's account via an activation code
Connectivity checks are disabled during setup because the phone must connect to the Cheeko AP (which has no internet access).
Service files involved: wifi_connection_service.dart, ota_service.dart, device_initialization_service.dart
Full step-by-step sequence is documented in the Device Setup Flow section below.
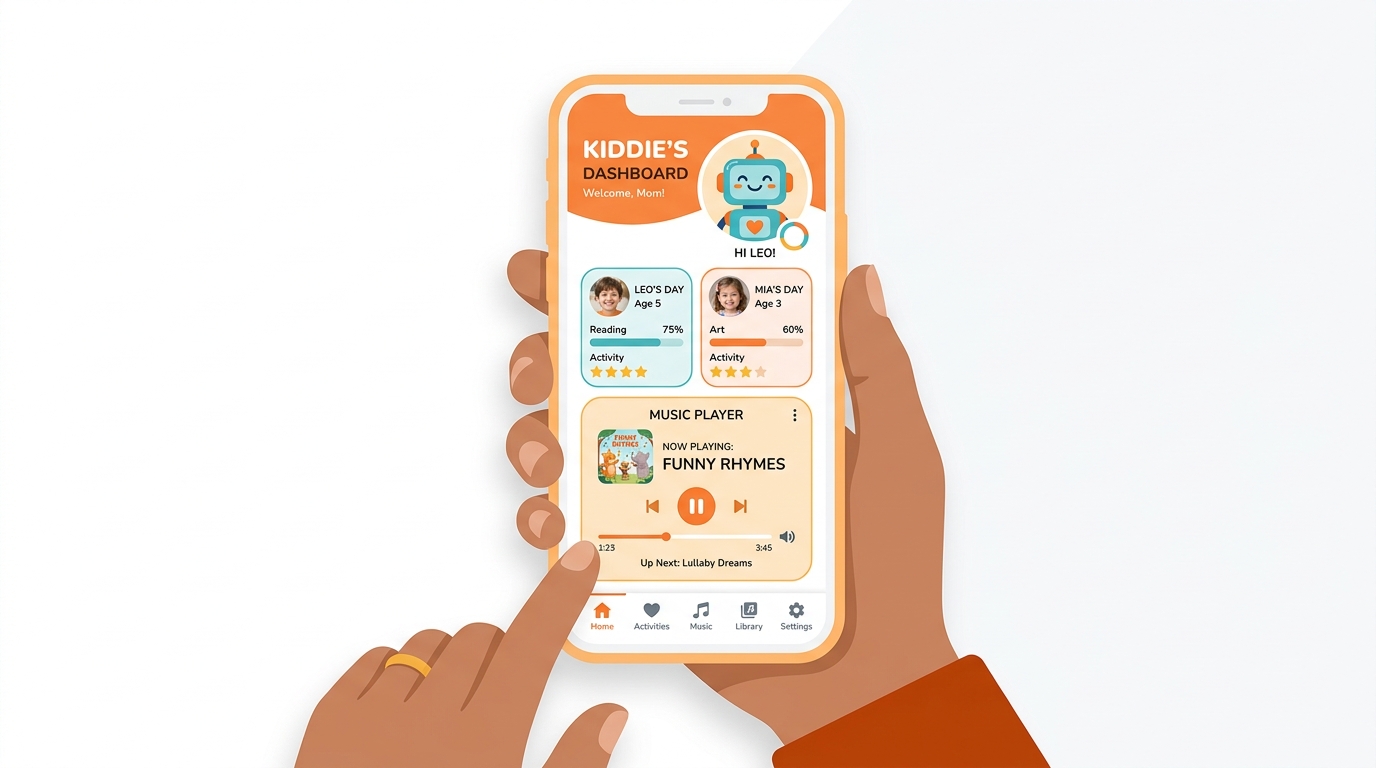
Home / Dashboard (home_screen.dart)
The first tab of the main navigation. Displays a time-based greeting and three activity entry cards.
Corner cards:
| Card | Route | Description |
|---|---|---|
| Chit-Chat Corner | /chit_chat | Select an AI character/mode for the device |
| Music Corner | /music_library | Browse and play music on the device |
| Story Corner | /story_library | Browse and play stories on the device |
If no device is activated, tapping a card shows a dialog prompting the parent to add a Cheeko or buy one. The "Add Cheeko" button opens the toy activation flow. The "Get Cheeko" button opens the shop URL (cheekoai.myshopify.com).
On first load, the screen also silently initializes MQTT connections for all registered devices via DeviceInitializationService.
Service calls on load:
JavaAgentService.getUserAgents— checks whether agents existJavaApiService.getUserDevices— checks whether devices are boundDeviceInitializationService.initializeDevices— fetches OTA credentials and establishes MQTT connections
Chit-Chat Corner (home/chit_chat_screen.dart)
Character selection screen reached from the Home dashboard. Lets the parent choose which AI mode/character the Cheeko device should use.
Four available characters:
| Character | Description |
|---|---|
| Cheeko | General conversation — chat about anything |
| Math Tutor | Basic arithmetic and number help |
| Riddle Solver | Puzzles and brain teasers |
| Word Ladder | Vocabulary and word chaining games |
The screen shows all four characters as animated flip cards in a 2-column asymmetric grid. The selected character is displayed larger in the top-left position. Cards auto-flip every 8 seconds to show a description on the back.
Key user actions:
- Tap a card to select a character
- Tap "Save Changes" to apply the selection to the device
If the user has multiple devices, a device selection dialog appears before the API call.
API calls:
GET /toy/agent/device/{mac}/current-characterviaCharacterService.getCurrentCharacter— fetches the currently active character on loadPOST /toy/agent/device/{mac}/set-characterviaCharacterService.setCharacter— applies the selectionJavaAgentService.getUserAgents— loads which agents are registered for the user
After a successful character change, a confirmation dialog instructs the parent to restart Cheeko for the change to take effect.
Kid Profiles
Creating a Kid Profile
Handled during onboarding via InteractiveKidsOnboardingScreen. See the Onboarding section.
Managing Kid Profiles
Kid profile management from the main app is listed as "Coming Soon" in ParentProfileScreen. The KidsService (kids_service.dart) is fully implemented and supports the following operations:
| Operation | Method | Endpoint |
|---|---|---|
| List all kids | getKids() | GET /toy/api/mobile/kids |
| Get active kid | getActiveKid() | GET /toy/api/mobile/active-kid |
| Create kid | createKid(...) | POST /toy/api/mobile/kids |
| Update kid | updateKid(...) | PUT /toy/api/mobile/kids/{id} |
| Switch active kid | switchActiveKid(id) | POST /toy/api/mobile/switch-active-kid |
| Delete kid | deleteKid(id) | DELETE /toy/api/mobile/kids/{id} |
Kid model fields: id, parentId, name, dateOfBirth, gender, interests (list), avatarUrl, primaryLanguage, additionalNotes, isActive.
The Kid model also computes age and ageGroup (Toddler, Preschool, Early Elementary, Late Elementary, Early Teen, Teen) based on date of birth.
All KidsService requests require a Firebase ID token in the Authorization: Bearer header.
Agent / Character Management
Character Management Screen (profile/character_management_screen.dart)
Lists all agents (AI character configurations) bound to the user's account. Each card shows the agent name, language, device count, and creation date.
Key user actions:
- Pull-to-refresh to reload the agent list
- Tap an agent card to navigate to
AgentDetailsScreen - Tap "Bind Cheeko" to start the toy activation flow and bind a new device
API call: JavaAgentService.getUserAgents → GET /toy/agent/list
Agent Details Screen (agent/agent_details_screen.dart)
Shows the configuration for a single agent and allows editing. Displays bound devices and available role templates.
Editable fields:
- Agent name
- Language (English, Hindi, Kannada, Malayalam)
- Role template (selected from server-provided list)
Key user actions:
- Edit agent name and language, save changes
- Bind a device to this agent
- Unbind a device from this agent
- Delete the agent (after confirmation)
API calls via JavaAgentService:
GET /toy/agent/{id}— load agent detailsPUT /toy/agent/{id}— update agent name/languageGET /toy/agent/templates— load available role templatesPOST /toy/agent/device/bind— bind device to agentPOST /toy/agent/device/unbind— unbind device from agentDELETE /toy/agent/{id}— delete agent
Device Remote Control (MQTT Commands)
The app acts as a remote control for Cheeko devices via direct MQTT connections. On app launch, DeviceInitializationService fetches OTA/MQTT credentials for each registered device and connects to the EMQX broker using mqtt_client. All commands are sent as function_call MQTT messages.
MQTT Connection Setup
- App fetches MQTT credentials from
POST /toy/ota/(broker host, port, client ID, username, password, publish topic) - Connects to EMQX broker using MQTT v3.1.1 with clean session
- Subscribes to
app/p2p/{macAddress}for status updates from the device - Does not send a
hellomessage — the app is a remote control, not a device
Available Commands
| Command | Function name | MQTT topic | Payload |
|---|---|---|---|
| Volume Up | self_volume_up | devices/{mac}/data | {"type":"function_call","function_call":{"name":"self_volume_up","arguments":{"step":10}},"source":"mobile_app"} |
| Volume Down | self_volume_down | devices/{mac}/data | {"type":"function_call","function_call":{"name":"self_volume_down","arguments":{"step":10}},"source":"mobile_app"} |
| Play Music | play_music | device-server | {"type":"function_call","function_call":{"name":"play_music","arguments":{"song_name":"...","language":"...","loop_enabled":false}},"source":"mobile_app"} |
| Play Story | play_story | device-server | {"type":"function_call","function_call":{"name":"play_story","arguments":{"story_name":"...","category":"...","loop_enabled":false}},"source":"mobile_app"} |
| Stop Audio | stop_audio | device-server | {"type":"function_call","function_call":{"name":"stop_audio","arguments":{}},"source":"mobile_app"} |
| Battery Status | self_get_battery_status | devices/{mac}/data | {"type":"function_call","function_call":{"name":"self_get_battery_status","arguments":{}},"source":"mobile_app","request_id":"req_battery_..."} |
Topic routing:
devices/{mac}/data— sent directly to the device (volume, battery). These are MCP commands the device handles locally.device-server— sent to the gateway, which routes to the active LiveKit session (play music/story, stop audio).
Incoming Status Messages
The app listens on app/p2p/{macAddress} for status updates:
| Message type | Fields | Description |
|---|---|---|
playback_status | status, title, timestamp | Playback started/stopped/error |
mcp_response | result, requestId, timestamp | Response to battery status request |
device_status | status, message | Device online/offline/error |
Service file: device_command_service.dart
Child Profile Management
Child profiles determine which kid is using a specific Cheeko device, enabling age-appropriate AI responses and personalized content.
Creating a Kid Profile
The first kid profile is created during onboarding via InteractiveKidsOnboardingScreen (see Onboarding). Additional kids can be added from the app.
Kid Selection Dialog (kid_selection_dialog.dart)
When binding a device or switching kids, a dialog loads all kid profiles via KidsService.getKids() and displays them as selectable cards showing name, gender icon, and age. If only one kid exists, it is auto-selected.
Assigning a Kid to a Device
After selecting a kid profile, the app calls PUT /toy/device/assign-kid/{deviceId} or PUT /toy/device/assign-kid-by-mac to bind the kid to a specific device. This tells the AI agent which age group and interests to use.
Managing Kid Profiles
The KidsService and KidsApiService support full CRUD:
| Operation | Method | Endpoint |
|---|---|---|
| List all kids | getKids() | GET /toy/api/mobile/kids |
| Get active kid | getActiveKid() | GET /toy/api/mobile/active-kid |
| Create kid | createKid(...) | POST /toy/api/mobile/kids |
| Update kid | updateKid(...) | PUT /toy/api/mobile/kids/{id} |
| Switch active kid | switchActiveKid(id) | POST /toy/api/mobile/switch-active-kid |
| Delete kid | deleteKid(id) | DELETE /toy/api/mobile/kids/{id} |
Kid Model Fields
| Field | Type | Description |
|---|---|---|
id | int | Unique ID |
parentId | string | Firebase UID of parent |
name | string | Kid's name |
dateOfBirth | date | Birthday (used to compute age and age group) |
gender | string | male or female |
interests | list | Selected from: Animals, Space, Dinosaurs, Fairy Tales, Superheroes, Music, Science, Art, Sports, Nature, Vehicles, Cooking |
primaryLanguage | string | English, Hindi, Kannada, or Malayalam |
additionalNotes | string | Optional parent notes |
avatarUrl | string | Profile image URL |
isActive | bool | Currently active kid for this parent |
Computed fields: age (from date of birth) and ageGroup (Toddler 0–2, Preschool 3–5, Early Elementary 6–8, Late Elementary 9–11, Early Teen 12–13, Teen 14–16).
Content Library
Both content screens share the same architecture: a search bar with 500 ms debounce, category filter chips, a tab bar (All / Favorites), paginated list (page size 20), and a favorites system via FavoriteProvider.
When a content item is tapped, a play dialog appears. The app sends a play command to the selected Cheeko device over MQTT via DeviceCommandService.sendMusicCommand.
Music Library (content/music_library_screen.dart)
Browse and play music tracks.
Key user actions:
- Search tracks by title
- Filter by category chip
- Toggle favorites (heart icon per track)
- Tap a track to open play dialog, then select device and tap play
- Infinite scroll pagination (loads next page automatically)
API calls via ContentService:
GET /toy/content/list?type=music— fetch paginated music listGET /toy/content/search?q=...&type=music— searchGET /toy/content/categories?type=music— category chips
Story Library (content/story_library_screen.dart)
Browse and play story audio files. Identical structure to the Music Library screen, using type=story in all API calls.
Chat History
Chat History Screen (chat/chat_history_screen.dart)
Lists past conversation sessions grouped by device. If the user has multiple devices, a dropdown selector appears in the app bar.
On load the screen auto-selects the first device and loads its agent's sessions. Sessions are listed with timestamp and message count. Infinite scroll loads more sessions automatically when the user scrolls within 200 px of the bottom.
Key user actions:
- Pull-to-refresh to reload sessions
- Select a different device from the dropdown (multi-device accounts)
- Tap a session to view individual messages
API calls via ChatHistoryService:
JavaApiService.getUserDevices— list devicesGET /toy/agent/{agentId}/sessions(paginated) — load conversation sessions
Chat Message Detail Screen (chat/chat_message_detail_screen.dart)
Shows the full message transcript for a single session. Messages are displayed in chat bubble style with time dividers between messages that are more than a set interval apart.
API call: GET /toy/agent/{agentId}/sessions/{sessionId}/messages via ChatHistoryService.getChatHistory
Analytics
Analytics Screen (analytics/analytics_screen.dart)
Displays usage statistics for the active device. Data can be filtered by period: Today, Weekly, or Monthly.
Statistics shown:
- Total sessions, total interaction time, total interactions
- Success rate percentage
- Longest streak and total streaks completed
- Skill level assessment
- Sessions broken down by mode (Cheeko, Math Tutor, Riddle Solver, Word Ladder)
- Weekly and monthly usage charts
- Recent session list
- Active streak count
- Game attempt statistics
API calls via AnalyticsApiService:
GET /toy/analytics/overall/{mac}— overall statsGET /toy/analytics/usage/{mac}?period=weekly— weekly usage dataGET /toy/analytics/usage/{mac}?period=monthly— monthly usage dataGET /toy/analytics/sessions/{mac}— recent sessionsGET /toy/analytics/progress/{mac}— user progress metrics
Parent Profile and Account (profile/parent_profile.dart)
The Account tab in the main navigation. Shows parent information and provides access to management functions.
Sections:
| Section | Contents |
|---|---|
| Parent Information | Name initial avatar, display name, Edit button |
| Profiles | Manage Characters (navigates to CharacterManagementScreen), Child Profile (Coming Soon) |
| Support | Contact Support (opens mailto:info@altio.me) |
| Legal | Privacy Policy link, Terms of Service link |
| App Info | Version number + build number; tap version 7 times to unlock developer PIN dialog (PIN: 8090) |
| Actions | Sign Out, Delete Account |
Delete Account flow:
- Confirmation dialog
- Progress dialog while the app deletes all agents (unbinds devices first, then deletes each agent)
- Calls
ProfileApiService.deleteAccount - Signs out of Firebase
- Navigates to
WalkthroughScreen
Edit Profile Screen (profile/edit_profile.dart)
Allows editing parent name and phone number. Pre-fills current values from ProfileApiService.getParentProfile.
API call: PUT /toy/api/mobile/profile via ProfileApiService.updateParentProfile
Authentication Flow
- Parent opens the app. Splash screen shows for 3 seconds.
SplashScreen._checkAuthAndNavigatechecksFirebaseAuth.instance.currentUser.- If no session, the app navigates to
WalkthroughScreen. - Parent taps "Sign in with Google" (Android) or "Continue with Apple" (iOS).
AuthService.signInWithGoogle/signInWithAppleruns the platform OAuth flow.- On success, Firebase returns a
UserCredentialcontaining the UID and ID token. AuthService._handleSocialSignInis called:- Updates
AuthProviderstate with the Firebase user. - Calls
UserStateService.getUserState(uid)to check backend onboarding state. - For Apple Sign-In with a name available, auto-creates the parent profile to comply with Apple Review Guideline 4.
- Updates
AuthResultis returned withneedsOnboardingandskipProfileSetupflags.WalkthroughScreenroutes based on those flags:needsOnboarding=true, skipProfileSetup=true→/kids-detailsneedsOnboarding=true→/parent-profile-setupneedsOnboarding=false→/main_navigation
- All subsequent Manager API requests attach the Firebase ID token:
Authorization: Bearer <FirebaseAuth.instance.currentUser.getIdToken()> - On sign-out:
SharedPreferencesis cleared (API environment setting is preserved), Firebase session is ended, Google session is ended on Android,AuthProviderstate is cleared, and the app navigates toWalkthroughScreen.
Device Setup Flow
Full provisioning sequence performed by ToyActivationScreen, WiFiConnectionService, and OTAService.
- Parent opens the app and navigates to toy activation (Home tab floating button, or "Bind Cheeko" in Character Management).
- Welcome step — an intro screen explains the process. Parent can tap "Continue" or "Skip" (which jumps directly to the activation code step).
- WiFi Configuration step begins.
- Parent powers on the Cheeko device. The device boots into AP mode and broadcasts an open WiFi network with SSID
CheekoAI. - Android: app scans for
CheekoAIusingwifi_scan(up to 3 scan attempts with delays). If found, connects usingwifi_iot. After connecting, the app callsWiFiForIoTPlugin.forceWifiUsage(true)to bind HTTP traffic to the Cheeko network and attempts to bind the Android process to the network interface. - iOS: app uses
NEHotspotConfigurationvia a native method channel to connect. After the system reports success, the app immediately callsGET http://192.168.4.1to verify actual connectivity (because iOS returns success even for non-existent networks). - App calls
GET http://192.168.4.1/scanto retrieve nearby WiFi networks from the ESP32 (sorted by RSSI). The parent selects their home network from the list. - Parent enters the home WiFi password.
- App posts
{"ssid": "...", "password": "..."}toPOST http://192.168.4.1/submit. - ESP32 responds with
{"success": true}. If it returns HTML, the app checks for success keywords. - App calls
POST http://192.168.4.1/rebootto trigger ESP32 reboot. (Timeout or connection error here is treated as success since the device has already started rebooting.) - Android: app calls
WiFiForIoTPlugin.forceWifiUsage(false)andWiFiForIoTPlugin.disconnect()to release overrides. Android auto-reconnects to the known home network. - iOS: system automatically disconnects from the Cheeko AP when it reboots.
- Activation code step. The app prompts for an activation code. The user enters the code printed on or included with the device.
JavaActivationServiceposts the activation code and the user's Firebase UID to the Manager API. This registers the device and creates the agent.- App calls
POST /toy/ota/with the device MAC address viaOTAService.fetchOTAConfig. The response contains MQTT broker host, port, client ID, username, password, and publish topic. DeviceInitializationServiceconnects to the EMQX MQTT broker using those credentials viamqtt_client. The device is now ready to receive play commands and character changes.- On success, the app navigates back to
HomeScreenand reloads the agent list.
Backend API Calls
| Feature | Service file | Manager API endpoint |
|---|---|---|
| Check onboarding state | user_state_service.dart | GET /toy/api/mobile/user-state/{uid} |
| Create user state | user_state_service.dart | POST /toy/api/mobile/user-state |
| Create parent profile | profile_api_service.dart | POST /toy/api/mobile/profile |
| Get parent profile | profile_api_service.dart | GET /toy/api/mobile/profile |
| Update parent profile | profile_api_service.dart | PUT /toy/api/mobile/profile |
| Delete account | profile_api_service.dart | DELETE /toy/api/mobile/account |
| Create kid profile | kids_service.dart | POST /toy/api/mobile/kids |
| List kids | kids_service.dart | GET /toy/api/mobile/kids |
| Update kid | kids_service.dart | PUT /toy/api/mobile/kids/{id} |
| Switch active kid | kids_service.dart | POST /toy/api/mobile/switch-active-kid |
| Delete kid | kids_service.dart | DELETE /toy/api/mobile/kids/{id} |
| List user devices | java_api_service.dart | GET /toy/device/list |
| Fetch OTA / MQTT config | ota_service.dart | POST /toy/ota/ |
| List user agents | java_agent_service.dart | GET /toy/agent/list |
| Get agent details | java_agent_service.dart | GET /toy/agent/{id} |
| Update agent | java_agent_service.dart | PUT /toy/agent/{id} |
| Delete agent | java_agent_service.dart | DELETE /toy/agent/{id} |
| Bind device to agent | java_agent_service.dart | POST /toy/agent/device/bind |
| Unbind device from agent | java_agent_service.dart | POST /toy/agent/device/unbind |
| Get current character | character_service.dart | GET /toy/agent/device/{mac}/current-character |
| Set character | character_service.dart | POST /toy/agent/device/{mac}/set-character |
| Music content list | content_service.dart | GET /toy/content/list?type=music |
| Story content list | content_service.dart | GET /toy/content/list?type=story |
| Content search | content_service.dart | GET /toy/content/search |
| Content categories | content_service.dart | GET /toy/content/categories |
| Chat sessions | chat_history_service.dart | GET /toy/agent/{id}/sessions |
| Chat messages | chat_history_service.dart | GET /toy/agent/{id}/sessions/{sessionId}/messages |
| Analytics overall stats | analytics_api_service.dart | GET /toy/analytics/overall/{mac} |
| Analytics usage | analytics_api_service.dart | GET /toy/analytics/usage/{mac} |
| Analytics sessions | analytics_api_service.dart | GET /toy/analytics/sessions/{mac} |
| Analytics progress | analytics_api_service.dart | GET /toy/analytics/progress/{mac} |
| Volume up | device_command_service.dart | MQTT → devices/{mac}/data (function_call: self_volume_up) |
| Volume down | device_command_service.dart | MQTT → devices/{mac}/data (function_call: self_volume_down) |
| Battery status | device_command_service.dart | MQTT → devices/{mac}/data (function_call: self_get_battery_status) |
| Play music on device | device_command_service.dart | MQTT → device-server (function_call: play_music) |
| Play story on device | device_command_service.dart | MQTT → device-server (function_call: play_story) |
| Stop audio on device | device_command_service.dart | MQTT → device-server (function_call: stop_audio) |
| Assign kid to device | kids_service.dart | PUT /toy/device/assign-kid/{deviceId} |
All requests to Manager API endpoints require Authorization: Bearer <Firebase ID token> except the OTA endpoint (/toy/ota/), which uses the device MAC address in the device-id header. MQTT commands use the OTA-provided broker credentials.
Building and Running
cd CheekoAI-Parent-App
flutter pub get
flutter run           # debug on connected device
flutter build apk     # Android release APK
flutter build ios     # iOS release archive
Android requirements:
google-services.jsonplaced atandroid/app/google-services.json- Location permission required for WiFi scanning (
ACCESS_FINE_LOCATION) during device setup CHANGE_NETWORK_STATEandACCESS_WIFI_STATEpermissions for WiFi provisioning
iOS requirements:
GoogleService-Info.plistplaced atios/Runner/GoogleService-Info.plistNEHotspotConfigurationentitlement in the app's entitlements file — required for WiFi provisioning- Apple Sign-In capability enabled in Xcode
NSLocationWhenInUseUsageDescriptionnot required on iOS for WiFi connections (handled byNEHotspotConfiguration)
Environment config:
- Copy
.env.exampleto.envand set the Manager API base URL before running. - At runtime the developer options screen (unlocked by tapping the version number 7 times in the Account tab, then entering PIN
8090) lets you switch between dev and prod API environments without rebuilding.